
Cleaning the Showerhead
●Light stains
Wipe the stains with water using a soft cloth or a sponge. Then dry the showerhead using a dry cloth.
●Tough Stains
Wipe the stains with a neutral pH detergent diluted with warm water using a soft cloth or a sponge. Once the stain is removed, rinse the showerhead and dry the showerhead using a dry cloth.
※The showerhead contains many parts that use resin. Refrain from using paint thinner, acetone, benzene, mold remover, acidic/alkaline detergent, and chlorine-based detergent, as this may damage the showerhead.
※Please refrain from using wire wool scrubbers or polishing powder as this may damage and/or leave scratch marks on the surface of the showerhead.
Freezing Prevention
Be sure to prevent freezing by following the freezing prevention methods in areas freezing may be expected. Damage to the parts and/or water leakage caused by freezing may result in the risk of property damage.
Freezing can cause damage to the showerhead parts, resulting in water leakage.
Make sure that the temperature of the shower area does not go below the freezing point.
If the shower area is suspected to reach the freezing point, take the following measures:
1. After usage, please shake the showerhead to get rid of any excess water.
2. Place the showerhead on the floor to release any excess water that may still reside.
How to clean the sprinkler head
There may be a decrease in the amount of water discharged or a disruption in the water flow when showerheads holes are clogged. If any of this happens, clean the sprinkler head by following the steps below.
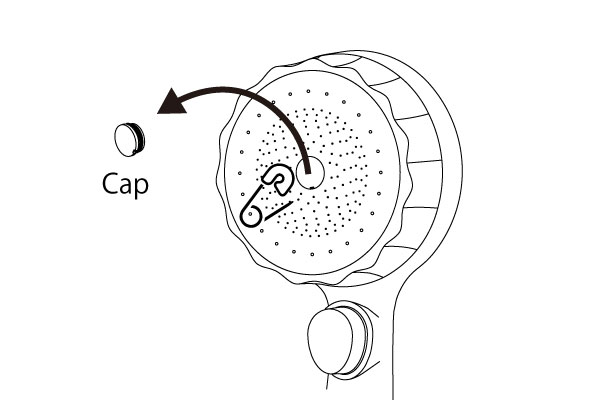
①Remove the Cap
Hook the tip of a safety pin, etc. into the middle hole of the Cap to remove the cap located at the middle of the Sprinkler Head.
※Check if the O ring (rubber part) attached to the Cap is transparent. If the O ring is black, the Sprinkler Head is not detachable.
※If the O ring is black, clean the showerhead with baking soda as shown in the video here.
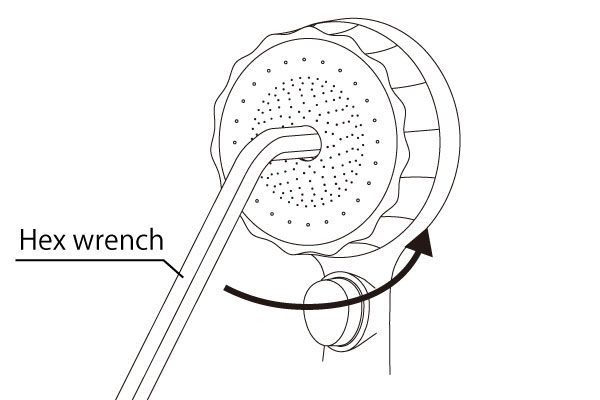
A hexagonal hole will appear when you remove the cap. Using a hex wrench (size 10mm (3/8”)), slowly turn the Sprinkler Head counterclockwise.
※When turning the hex wrench, hold the wrench short and turn it slowly.
※When turning the hex wrench, turn it slowly and carefully. If the wrench slips, the hexagonal hole may be scrapped. The Sprinkler Head may not be able to detach if the hole is damaged and repair/cleaning may not be possible.
By removing the Sprinkler Head, you can detach the 3 showerhead parts: Sprinkler Head, Strainer, and Guide.
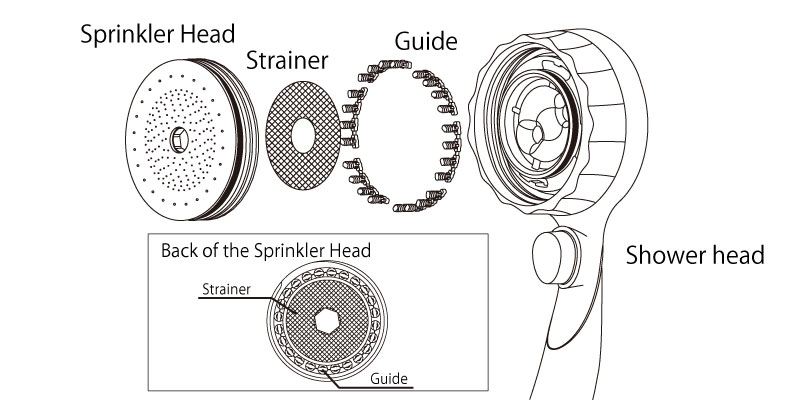
Detach the Strainer located in the back center of the Sprinkler Head by hooking it on the tip of a safety pin, etc. Next, slowly detach the Guide, separated into 6 pieces, located at the back end of the Sprinkler Head, by hand.
※The Guide may tear when it is being removed. Even if it gets torn, the showerhead can still be used without a problem, by refitting them in its original position.
※When detaching the Sprinkler Head, parts other than the strainer or guide may also come off from the main body. If other parts come off, please reattach the parts to the main body by referring to the “Installation manual for detached parts” located at the bottom of this manual.
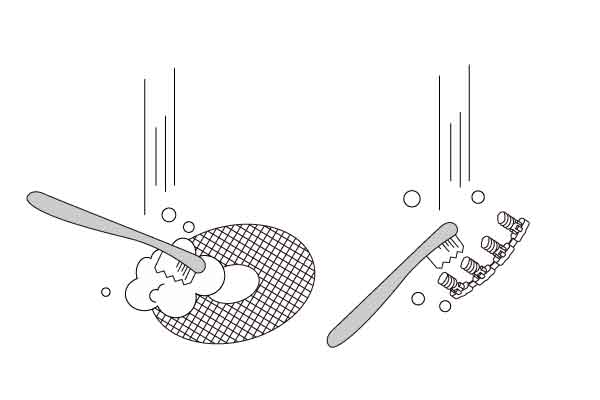
⑤Remove the dirt/debris
Scrape off any dirt/debris on the Strainer and Guide with water using a toothbrush, etc. If there is dirt/debris on the Sprinkler Head, wash with water similarly.
Insert the Strainer and Guide in their original positions and align the Sprinkler Head with the screw on the main unit. Use a hex wrench to turn clockwise to tighten the screw, be careful not to let the O ring pop out.
※When turning the hex wrench, hold the wrench short and turn it slowly.
※When turning the hex wrench, turn it slowly and carefully. If the wrench slips, the hexagonal hole may be scrapped. The Sprinkler Head may not be able to detach if the hole is damaged and repair/cleaning may not be possible.
⑦Reattaching the Cap
Reattach the Cap in its original position.
Installation Manual for Detached Parts
When removing the Sprinkler Head, there may be parts such as the Switching Body, Spring Lid, and Spring that may come off from the main body. In that case, follow the following steps to reattach the parts.
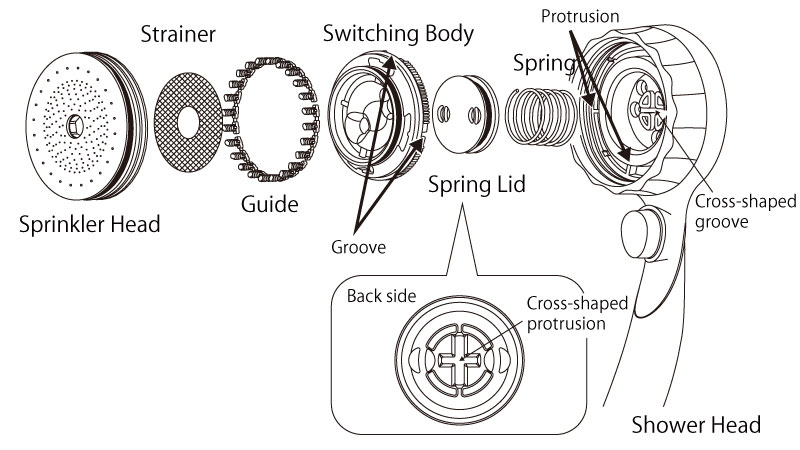
1. Insert the Spring into the hole in the main body.
2. With the Spring still in place, push in the Cross-shaped Protrusion on the back of the Spring Lid into the Cross-shaped Groove on the main unit, aligning the cross.
※Be sure to carefully check the vertical and horizontal thickness of the cross, before installing it in the correct orientation.
※Be careful to not let the O ring (rubber part) pop out.
3. Align the Groove parts in four directions of the Switching Body to the protrusion on the main body, and then push them in together.
※Be sure to carefully check the thickness of the protruding parts before installing them in the correct orientation.